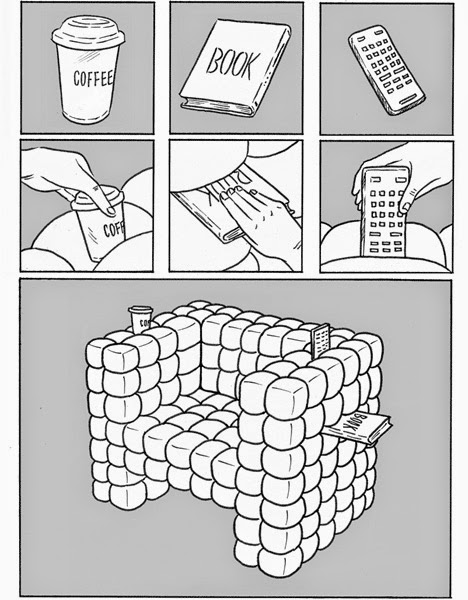
Comfy Chair Cushioned with Built-In Storage

Is
this the lost-and-found paradise? A unique and comfortable chair plans to be
your perfect companion during your lounging activity. Although seen as a
traditional enemy to keeping your keys, money, pens and other small objects
safe, this one cushioned chair will impress you from the very moment you lay
your eyes on it. The design is genius! Mimicking the process of a normal pin
cushion, Daisuke Motogi Architecture took the entire world by surprise when it
applied the same principle to a chair. The clever piece of furniture is made
from pixel-like pads that cover its whole surface. And it does so with the most
care for comfort possible! Both inside the chair and outside it, slots are
formed between the pads that will act like holders for almost any type of
object that you will likely have in this sort of environment (books, remotes,
drinks). It might be a bit tricky to clean it, but the Lost & Found
Comfortable Chair will definitely be a blessing for your home. A perfect
addition to the interior design and a useful holder for all of your stuff!


Source:dornob

Transform a Regular Dining Table Into a Very Nice Pool Table

When it comes to entertainment, we would
like to have most of the facilities in one place. That's why intricate
entertainment units (that combine TV with internet and audio systems) have such
a huge success among fun lovers. And when you thought there isn't anything more
left to see in this area, we are pleased to show you this awesome luxurious Billiards
and Dining Table Model with Flap Table. What this piece of furniture actually
is, as clearly seen in the images, is a table which can easily transform itself
from a regular coffee or dining table, into a very nice pool table. The top
opening covers greatly a billiard table which is high-quality and will definitely
save you much-needed space for other types of activities (like a board games
night). The special hinges installed in the table can be opened at 270 degrees
in order to make room for the billiards surface. The table has drawers for the
set of balls, as well as a triangle, 6 pieces of chalk and 4 extra cue tips.
Two cues are also provided. It comes in various sizes and you can have it in the
color you desire to match the décor of the room you place it in. The product is
completely manufactured from MDF in E-1 standard and protected by patents owned
by the company. Bottom line is that with this table, you can have a normal yet
stylish table while being able to transform it very comfortably into an
entertainment opportunity!


The Rekindle by Benjamin Shine

We
all agree that candles can be quite the romantic ambiance setter. They come in
all sizes and shapes, and can release almost any kind of fragrance you might
think of when lit, to the entire room. But there is a problem with candles! A
problem that nearly prevents people from using candles in a regular way. The
thing we're talking about is the melting wax, of course. Although seen as a
romantic addition to an interesting foreplay, melting was is kind of a pest to
furniture and fabric. When you lit a candle, you are constantly worried about the
wax not burning off your bedside counter or living room coffee table. With the
Rekindle Candle you don't have to think like that anymore! The special designed
candlestick holder is actually collecting the drips of hot wax that melt away
when the candle is burning. The wax is accumulated into a transparent stem
around a centrally positioned wick. When filled, you can easily remove the new
candle from the container and start all over again. The beautiful and very
useful product can be made in stainless steel but also in porcelain and
aluminum. One use of this device and you will definitely want to use it again
and again, every day, turning you into a cureless romantic!
Source:benjaminshine
The Ironing Board/Mirror

This next item is a very useful one for all the ladies who
like to be neat and elegant all the time. The great thing about it is the
two-in-one aspect, and namely that it is both an ironing table and a mirror.
The object is called „madame est servie” and it has two positions: one
horizontal one, when it becomes an ironing board and one vertical position when
it transforms to a mirror. It has a lock that helps you secure it in every
position and you won’t have to worry about its stability. The ironing
board/mirror can be cleaned easily as it from a material that is both high
quality and very practical to use. In case you don’t have a larger mirror in
your home, but you would like to see your outfit before going out in town or at
work, then the mirror will be very helpful as it is long enough to see yourself
from head to toe in it. Once you have found the perfect spot for this object
you can use it in your day to day activities as it is easy to lift and you can
just grab it and take it exactly where you need it to be. If you don’t have
much space in your home this ironing board/mirror is also very easy to store as
you can just secure it in the vertical position and place it behind or near
your drawer.
Source:aissalogerot


Creative Ways to Decorate Easter Eggs

Making the home ready for Easter requires you to prepare at least a couple of eggs in a festive way. We suggest you try and make some Polka Dot patterns on colored eggs. It’s a simple and fun way, because it involves using stickers. Here is what you will need to use in this DIY project:
• a cup of water;
• a tablespoon of white vinegar;
• some boiled white-shell eggs;
• food coloring;
• simple circle stickers;
• a metallic spoon;
• ribbons and lace straps;
• a basket;
First of all, boil your eggs and work with them after they're cooled off. Apply the round stickers onto each egg. Now, work with a glass of water in which you add the vinegar and food coloring of your choice. Stir with the spoon for a bit. Use the same spoon to dip the egg in for half a minute. You could play with the final shading, leaving the egg in the water more for a darker color and fewer for a lighter one. Take out and dry them before removing the stickers. You can rub the surface with some olive oil to give them a bit of a shine. Congratulations, the Easter Eggs are done! Decorate a basket with ribbons and lace straps, place your eggs in this basket and have a Happy Easter!
source: larecetadelafelicidad.com
Cute Elephant `Painting` Out Of Buttons

You might see more and more complex DIY projects out there
on the internet. Some will teach you how to make exquisite dishes and some will
show you how to build yourself an entire home out of logs. We'll show you how
to make a cute elephant `painting` out of buttons, which can go perfectly as a
baby shower gift! This is all that you will need:
·
a bunch of colorful buttons;
·
a piece of cardboard or canvas;
·
glue;
·
(optional) pencil or marker;
·
a black frame;
We want to warn you that the following steps do
require some artistic skills of a 4 year-old. So, firstly think about what the
elephant should look like. You can simply copy the example shown here or come
up with a more authentic one. While you're at it, feel free to experiment with
different poses of the elephant, or any other kind of animal for that matter!
If you like a slug, then do the snail; it's entirely up to you. The next steps
are quite easy and will transport you to the days of craft classes in school.
Glue each button, one at a time, to the canvas or cardboard. Use different type
of colored buttons to mimic different objects, like grass or balloons. You
could use a pencil or marker in order to make some of the smoother or not the
easy shapes: the little heart or the string for the balloons. When the glue has
dried completely and your `painting` has hardened, put a black frame around it.
Done!


Source:bustedbutton
Use Green Papaya for Uric Acid Problem
Healthcare is on the lips of every journalist and politician nowadays. And for once, they are talking about a real issue in everyday life of ordinary people. We tend to care more and more about our health, not because there are lots of new and crushing diseases out there, but because it is now easy to treat ourselves right at home. Sure, medicine and modern pharmacology has come a great length into fighting infections and serious illness, but some natural remedies are still working great. Specialists even advise on reducing the amount of antibiotics people use for treatment, and let the immunity system fight its battles. But we can help the immune system get stronger and stronger with a bunch of natural herbs and homemade solutions. Mixing regular green tea with some green papaya cubes will get you impressive results if you got uric acid issues. Or gout for that matter! The effects of drinking regularly this potion will be seen after a couple of weeks.

All you have to do is:
1. Cut 1 green papaya in little cubes and mix them into boiling water.
2. Add green tea leaves into the water when it starts to boil.
3. Using another papaya as a tea pot, cut off its top and remove the seeds from within.
4. Make a small hole with a sharp knife into the upper side part of the fruit.
5. Pour the tea into it and cover with the top which you cut earlier.
6. Serve right away!
Broomstick Lace Bracelet
If you want to have a trendy and unique piece of accessory, but don't want to spend all of your savings on it, then there are a lot of great alternatives. The most convenient and creative one is to make the accessory yourself, as handmade things won't ever go out of style. So this next item that you will learn to make today is called a broomstick lace bracelet and to make it, you will need to follow the steps below. Broomstick lace stitch can seem a bit complicated at first, but after the first 5-10 rows it will be much easier.

Let's start with the supplies:
·
smooth yarn such as bamboo cotton (any color you
like);
·
one 4 mm hook;
·
one 15 mm crochet stitch;
·
three buttons;
Check all instructions in the link below...
CultOfCrochet – Broomstick Lace Bracelet
Modern and Minimalistic Planter

If you like plants and have a lot
in your, but you still didn't find the perfect planter for them, you can chill
as the search is over. This next tutorial will teach you how to make your own
handcrafted planter that is both very modern and minimalistic looking and
simple to make. Your plants will no longer just lie around in your home, as
they will become a part of the interior decoration. For this craft projects you
will need:
·
cardboard;
·
scissors;
·
measuring tape;
·
contact paper (copper colored);
·
plants;
·
knife;
·
glue;
Take your plant and measure the
diameter of the pot and the height of it. If it doesn't have a pot, simply
measure the plastic container in which it is placed. Then mark the measurements
on the piece of cardboard and cut out the shape of the planter. Place the
cardboard on the contact paper to see what size you need to cut it, in order to
cover it nicely. Mark the sides of the planter, by slightly tracing the sides
with a knife. Take off the paper back of the contact paper and place the
cardboard on it. Cover the cardboard with the contact paper and fold the ends
of it as if you were wrapping a gift. Secure to ends and then fold the
cardboard in order to get the shape of your planter. Join the two ends and add
a bit of glue to keep them together. Place your plant inside and your new
geometric planter is done. Looks really cool and stylish!


Source: curbly
Eggshell Candle Centerpiece

Decorate your room with this
creative table centerpiece. For this year's Easter festivities, improve the
interior design of your dining room with this fun craft project. Here is what
you will need in order to pull up this DIY Eggshell Candle Centerpiece:
·
a bunch of eggshells;
·
as many Tealight candles as eggshells;
·
an egg holder;
·
food coloring you want;
·
a couple tablespoons of vinegar;
Make sure the eggshells have the
opening as wide as the candles, because they will have to fit inside. Clean and
maybe wash them with care before applying the desired color. Remove the
membrane as well from the egg as well. Take a bowl of warm water and combine
with vinegar and the food coloring of your choice. Then dip the shell in this
mix for 5 to 10 minutes and place it away to dry. Repeat the process with every
eggshell and color. Finally, position the candle in each and lit it up. They
look great!
Source:littleinspiration
Easy Recipe For Making Candy Apples
Classic desserts never get old;
that's why they call it classics! Today, we suggest a great and easy recipe for
making Candy Apples. But not just any candy apples, but the kind you will
definitely want to enjoy with a fork and knife.

· six apples;
· half a dozen of skewers;
· pot;
· pastry brush;
· bowl for water and bowl for topping;
· a candy thermometer;
· baking sheet;
· half a cup of light corn syrup;
· a couple of cups of sugar;
· three quarters of a cup of water;
· toppings like toffee, chocolate chips, jelly bears, candy corn;
· (optional) food coloring of your choice;


First, make sure your toppings are
shredded into small bits so they will adhere to the apples nicely. Pout each
into a bowl and continue towards the next step. Apples should be speared by
skewers in the top part, where you'll usually find small leaves. Then, move
onto cooking the syrup with sugar and about a cup of water. This will require
medium to high heat and you stirring it until the sugar is dissolved. Afterward
you can bring it to a boil. Take the bowl with (warm) water and the pastry
brush soaked in it, because you aren't supposed to stir in the pot anymore, but
are advised to brush the sides of the pot in order to stop the forming of
crystals. To get a soft candy mixture, simmer it until the temperature hits 290
degrees Fahrenheit.
Now, take your apples by the skewers and dip them, one
at a time, completely into the candy. You could swirl your apples in the tilted
pot to make sure they are fully coated. Next, it's entirely up to you what
toppings you would like on your teeth-soaring apples. Dip each apple in a bowl
you prepared earlier. If there is any space left on a certain apple after you
dipped once, move onto another bowl of toppings and repeat the step. Feel free
to combine them in any way you think they might be more delicious or look better.
When done, place all apples on a baking sheet and transfer into the fridge. Bon
appetite!
Source:instructables
Cozy Studio With Ingenious Storage Solutions In Manhattan

This is an example of an amazing Manhattan studio by Jordan Parnass Digital Architecture, designed on only 500 sq ft. This small apartment has a modern and natural look. The studio has many storage spaces, as the stairs or the kitchen furniture .The kitchen, bedroom and the other wooden accents with straight lines transform an ordinary space into a bright and functional space. The 5 units of storage in the staircase is an example of preserving space and combining it with functionality. The same can be said with the reflecting panel wall opposite the couch. The feeling of space is also accentuated by the clever use of little details, like a mirror between the only couple of windows in the loft, or the minimalistic décor. Take a closer look at the images, surely you will find something that will inspire you.


Cute Hello Kitty House

Is Hello Kitty your favorite character? Do you like all kind of stuff with Hello Kitty? We found this amazing house that was built in Shanghai, China. Pink is the mostly used color in the house. You can see from the pictures that walls, carpets and sofas are also pink or have the shape of the beloved brand. The “Hello Kitty House” is a tourist attraction for all visitors. It’s not only that the bed or pillows and coasters have the Hello Kitty touch to them; it’s the approach of the designers. The whole concept doesn’t yell out kitsch. Choosing to use the brand in an indirect, suggestive manner instead of overwhelming the inhabitant with Hello Kitty eyes everywhere, the room is something which kids and teenagers alike want. Doesn’t it look great?


Tiny Floating Home

This small floating boathouse, was turned Karen Jenkins and her husband into a nice and cozy home, a place where a family of five enjoys full comfort. The house is almost 50 years old, and when they found it, it was in a bad shape. They bought it, and started searching for ideas of how to design this 220 square feet interior. One of the most challenging things was that the size of a boathouse is restricted to only one-story and they could not use up any more lake space. So after a thorough search, the family decided to make a loft out of the house, to make it look bigger. In order to make the house look like it has a lot of space they installed window dormers so they went up four feet and put in some windows. They also used the 4 foot porch. Some of the studs were damaged by water and thus they had to replace it and had to redo the pluming and electricity. Water and electricity are supplied by the marina and the family chose to use an incinerator toilet. This house is a great example of how to make a tiny space look both big and cozy. It is ideal for a family and also takes you closer to nature.


A Baby's Foot
Foot massages aren't just for
overworked adults who are stressed out after a full day at work. They do some
great results when dealing with a baby's problems. Be careful as this is not a
replacement for proper health care and medication, but a relaxing technique to
calm a baby when it cries and feels all kind of discomfort in their little
bodies. The foot has different areas that correspond to a certain area of the
body. Apply gentle pressure to the areas mentioned below in order to soothe
some of the areas where the baby might have some problems. For instance, the
toes are linked to the head and teeth and everybody knows much of the problems
of youth are related to these areas. The belly of the toes is for relieving
discomfort from sinuses, whilst the center of the foot has a corresponded to
the solar plexus of the baby. The heal area is known to be linked to the pelvic
region and last, but not least, the abdominal area is divided into two (upper
and lower sides) which is said to bring comfort to the belly of your baby.

Log Cabin Interiors Design Ideas

The country house.To be far away from the noise and the bustle of the town, we opt for a house at the outskirts or for one placed in a rural area. The country house represents, for many persons, a vacation or weekend home, where they choose to spend the warmest days of the summertime.
The comfort is essential to have a successful vacation, and it is because of this reason why some people avoid spending their time at countryside. The rural houses are endowed with ventilated and spacious rooms, but, because of their rural style, some of them seem being deprived of comfort.
Still, an old rural house can also be stylish and elegant, and, at the same time, can provide the same comfort as an urban house. You can give a new ‘look’ to your house by using old, traditional objects, found on site or by changing radically the rural aspect of the house, by using modern decorative objects.
But a house placed in the heart of the nature requests to be adorned with as many natural things as possible. Therefore, the specific chromatic palette of such a decoration is made up of pale shades, while the furniture is made of wood, its too many ornaments being left aside. Both the ceiling and the floor have a massive wood based structure which, if there are not deteriorated, it is not advisable for you to replace them.
The ceiling and the floor – generally, in old houses, both the ceiling and the floor are of massive wood, painted in natural colors which we suggest you to leave them as they are (maybe just to restore them, in case they are deteriorated).
The walls – as a rule, they are commonly white. They can be improved by using natural or decorative stones – a new material keeping the same rustic shade, or they can be painted in retro colors, as green, orange, brown, mustard yellow, purple, dark pink, turquoise, blue, combinations of black, white and red; all of them are suitable for a retro-styled house.
The windows dispose of frames made of wood, often painted in white. Not even here can you make great changes, taking into account the fact that the windows doesn’t fit the overall architectural style of the house. But you can give some color to the wood frames choosing a shade in accord to the ones of the curtains and the drapes. On the other hand, most of the changes could vise the furniture and the decorations of the rooms. The extant furniture could be restored or replaced with one of the ‘classical furniture’ category. Made of massive wood, this will contrast the floor and the ceiling, and the final outcome is both impressive and elegant.
As each detail matters when it comes to interior decorations, don’t forget the object dedicated to this purpose only. The decorative pillows may give a vintage aspect if you use a thick material, of a sac; the lightening objects made of wire and covered with textiles can be easily integrated in the setting, while some vases for flowers made of small sticks will enliven the room. In order to create a transition between the interior and the exterior, you can also fit out a terrace or a verandah. Also, to gain space, transform the loft of the house in a guests’ room, a children’s room, a bedroom or a relaxation area.


Abonați-vă la:
Postări (Atom)


