Modern Greek Home Design

When you don’t have enough space to build a modern and still pleasing piece of architecture, you improvise; especially if you don’t want to compromise to the actual living area. This Greek home design combines an interesting use of rectangular shapes with glass and fine decorations to surprise viewers both from the outside and on the inside. Office Twentyfive Architects managed to deliver an impressing 2 story residence squeezed between other big buildings and a newly placed suburb park.


Contemporary Residential Project in Spain

A plain design that impresses with its unique style is what everybody wants for their home. Not too loaded, with a simple white overall paintjob, the Palma de Mallorca’s downtown residence may be confused with a holiday resort, as it uses its surroundings to its advantage and architectural success. The contemporary design of the house blending it smoothly in the natural environment makes it a real jewel in the old European peninsula.

With a spacious ground floor that involves the lobby, kitchen, dining and living room into one large exhibition of modern decorations, the design of Alfonso Reina doesn’t bother with complex architectural details. Sleek lines are guide for the exterior as well as the interior. Sliding doors make room for the both to interact in a very visual and colorful way. The white predominance is therefore dyed down in all rooms. The second floor follows the same concept, with bedroom touching forest through a big corner glass window. Hardwood floors and green plants are combined to give the warm home feeling, while the outside is beautifully soaked in the Spanish sun freely bouncing off the terrace and swimming pool.


Bavarian Landscape: Eco-friendly House With Unusual Shape in Germany

Blended in the Bavarian landscape, the minimalist approach of Stein Hemmes Wirtz to natural architecture, makes building modern, contemporary and eco-friendly homes more beautiful and inspiring. The unique and green-energy oriented design sets this residence apart from any other in Germany. Adapting to the irregular sloping of the land, the shape of the roof and whole impressing aspect of the structure is what defines the house from a long distance. Materials are also in balance with the natural concept.
To make sure it suits the standards for an ecological building, the architectural lines were blended with modern solar panels. The connection with nature is made with eco building materials, wood making the main statement in this area; on the outside terrace, but specifically on the whole exterior of the house. Wood covering the structure (with no industrial glue used) gives more mobility than concrete would ever achieve.


French Yoghurt Cake with blood oranges
Inventing new kind of sweets every week is a hard job. For every homemaker’s relief, the internet is abundant with plenty recipes. Sharply written and ready to implement in your home, the following tutorial we offer, will result in a tasty French yoghurt cake with blood oranges. The nicest trick about this is you can make the dessert 3 days in advance and be ready to serve! Grab these ingredients which we’ll use for the cake:
• a couple teaspoons of baking powder;
• about 2 cups of flour;
• a cup of sugar;
• a teaspoon of salt;
• a tablespoon of lemon or orange zest (finely grated);
• about a cup of Greek yoghurt;
• half a cup of veggie oil;
• a couple of large eggs;
• two blood oranges;
• half a teaspoon of vanilla extract;
• a tablespoon of orange blossom water;

Take a bowl and combine the baking powder with flour. Add salt, stir a little bit more and leave aside for a while. Rub lemon zest in the sugar into another bowl. Stop when the sugar becomes moist. Pour the eggs, blossom water, extract, oil and yoghurt over it. Mix well. Use a rubber spatula to add the flour from earlier and blend a bit. Put your batter in a greased and floured tin. Decorate the top with sliced peeled oranges. Place in the oven for the next hour or until the center is baked. Remove from tin and leave for 15 minutes to cool before serving. Enjoy your dessert!
source: chilitonka.com
Tiramisu Cheesecake Recipe
Making a popular dessert is a sure
thing to get peoples' approval in the food department. But if you have a touch
of creativity, you are encouraged to experiment with little twist. Like this
Tiramisu Cheesecake. Extra delicious and friends extra impressed. Here is what
you'll have to do if you want the same great result.
·
a quarter of a cup butter (melted);
·
one and a half cups of gingersnap cookie crumb;
·
a couple tablespoons of gelatin;
·
two thirds of a cup of sugar;
·
two cups of heavy cream;
·
four large egg (yolks);
·
a quarter of a cup of cocoa powder;
·
half a cup of Espresso;
·
half a kilo of Mascarpone cheese;
·
half a teaspoon of salt;
·
a dozen lady fingers;

Every cake should begin with
preparing the utensils and other tools you will be using. For instance, take an
8-inch spring form pan, grease and line it, on bottom and sides, with some
baking paper. Also make sure you turn the oven at 350 degrees Fahrenheit and
leave it to preheat until you make the actual cake. Start making the crust. Do
this by stirring the butter with cookie crumb in a bowl and with a fork. When
completed, press it on the bottom of the pan and put in the oven for 15
minutes. Leave it to cool while you work on the filling. Take a quarter of a
cup of cream and sprinkle gelatin over it allowing it to stand for the next 5
minutes. Use the remaining cream for later, but beat it until you obtain stiff
peaks beforehand and store in the fridge.
Mix together the eggs with salt and
sugar in a bowl over a simmering water filled pot. You will not stop until the
sugar is gone, dissolved into the mixture. Take out of the pot and away from
the oven. Blend with the gelatin substance from earlier. Meanwhile, make the
Mascarpone fluffy; some 5 minutes with a medium speed mixer should take care of
that. Add the egg and gelatin from before while you still mix (but maybe you
should slow the speed down a bit for this step). Do the same with a quarter of
a cup of espresso and later on the whipped cream. Take this filling and spread
half of it on the crust. The remaining espresso will be used for soaking each
lady finger. Afterward, the latter ones should be put over the cheese filling
and covered with the rest of the mixture. Use a simple spatula to level the
surface before covering the cake with a plastic wrap. Put to freeze for the
night and sift cocoa powder over it for serving.
DIY Marble Nail Art [video]
Beautiful and nice nails are a must for any women. This next tutorial will show you how to make yourself a neat and unique nail art to match all your evening outfits. It is a heart pattern for your nails that is more suitable for a special event than for an office environment. Your nails will look as if they were covered in marble. To create this nice nail pattern your will need:
• a bowl;
• nail polish in two different colors (one darker and one lighter);
• a stick;
• water;

Take out a bowl and fill it with water. Gradually add a pinch of each nail polish to the water. Alternate the colors, first add a drop of the darker color, then a drop of the lighter and then again one of the darker color. Always add the next color in the middle of the previous one, like a bulls-eye. Let the colors spread before adding the next drop. Repeat these steps 6-7 times. Take the sticks and draw a line in the colors at the top and bottom and then draw lines from the sides to the middle of the bowl. This way you will get the heart shapes, chained into each other. When you are done just place your nail in the bowl and the nail polish will cover it. Make sure to protect the rest of your finger so the nail polish will only cover the nail part. Dip your nail in the water and that is all. Looks beautiful, right?
Strawberry Cheesecake Recipe
Desserts don’t magically appear in your fridge, especially if you don’t want to give any money to a baker or pastry. Be ready for any weekend laziness by preparing this very tasteful piece of dessert. The Strawberry Cheesecake Bars are so great and easy to make, you will be making this to last you for the whole month. We don’t recommend it, but when you’ll grab a bite, there won’t be any cheesecake left after a week’s time. Here is what you need to have and do.
• a dozen Medjool dates;
• one and a half cups of brown rice cereal flakes;
• an eighth of a cup of toasted hazelnuts;
• two tablespoons of coconut oil (melted);
• 750 grams of cottage cheese;
• a teaspoon of vanilla extract;
• three tablespoons of raw honey;
• a bit of cinnamon;
• ten gelatin sheets;
• three tablespoons of boiling water;
• a cup of fresh strawberries;
Begin with the crust. Make this by soaking pitted dates for 10 minutes in some water and put them in a food processor...check all details in the link below..

Muscle Body for Everyone
This next item is pretty funny, but may come in handy in some situations, especially if you are going to a costume party and you're a guy. It is a six pack that can be attached instantly to your chest so it will transform you into the ultimate superhero. This six pack is very similar to the costumes used in movies, when it comes to an actress playing the role of a pregnant women. This product is made of a material that will take up the shape of your body and it won't look fake under a shirt. So, if you are planning a costume party or want to dress up as a superhero for next Halloween, you should purchase this item as fast as you can. It costs $283.20 and no one will ever guess how you managed to grow some perfect six packs over night. This six pack suit is also great if you want to make a good first impression, but keep in mind that people will find out eventually that you wear a suit. Buy this suit and wear it so that you get used to looking that good and it will surely pursue you to go and work out for real. This way you will have real six packs and you will feel much better about yourself.

Available here
Ranch Chicken Club Roll-Ups Recipe
After a long day horsing around, your stomach often craves for a tasty treat, in the form of a sandwich or dessert. Let's focus, for now, on the nutritious and delicious Ranch Chicken Club Roll-Ups which you can assemble in no time. Get ready to empty the plate in a matter of minutes after these flavored roll-ups are done. Grab the following:
• some ranch dressing;
• 8 chicken tenders;
• 16 slices of bacon;
• 8 slices of Colby Jack cheese;
• 2 cans of crescent roll dough;

Take the dough and press it into rectangles while you sauté the chicken until it's cooked through. Preheat the oven to 375 degrees Fahrenheit and spread a couple of teaspoons of ranch onto the crescent rectangles. Begin to `build` the sandwich by putting a slice of cheese, 2 slices of bacon and a strip of chicken. Roll the dough from the borders inward. Now, it's time to place them on a baking sheet covered pan, with the seam side downward, and oven for 20 minutes. All done! Put extra dressing on the side of the plate you will soon be emptying.
source: lifewiththecrustcutoff.com
DIY Cute Easter Craft
Does Easter preparations scare you? They shouldn't! Making the appropriate decorations can be stress-free if you choose the DIY version of things. Take this cute Easter craft you could easily make in no time. It doesn't require intricate skills or materials and the steps are quite simple. Grab the following:
• a tin planter;
• a couple of Styrofoam cubes;
• shredded paper or Easter craft grass;
• lollipops or any other treats on a stick;
• a can of glossy spray paint;

Begin with spraying the planter and leaving it to dry overnight. After some 20 to 24 hours have passed, take the planter and almost fill it with the foam cubes and some shredded paper. Don’t be very thorough at this point. You now need to stick the lollipops (preferably they have an Easter motive) into the foam. Then, it’s time for a neat job covering the Styrofoam entirely with the paper or grass. You want the bunnies to look like they are popping from the ground, not from the foam. Decorate some more with some personalized tags and/or ribbons. And there you have it: a beautiful display done entirely by you. DIY FTW!
source: sweetmetelmoments.blogspot.com
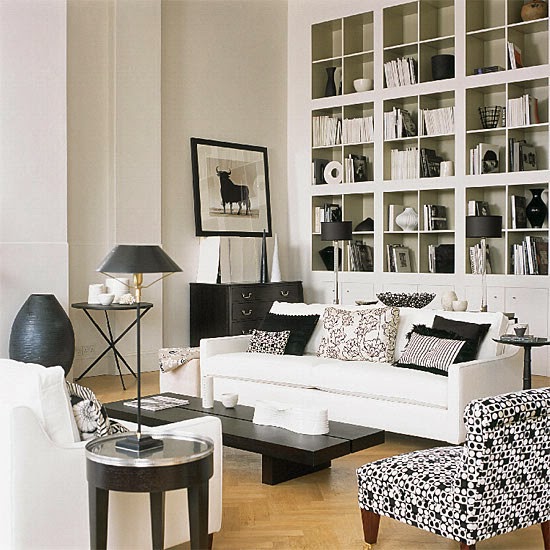
Black and White Living Room

The living room is the heart of our homes even if we call it lounge room, front room, sitting room or living room. It is the most significant place in which our family and friends meet, the place where we greet our guests, socialize and, why not, relax. We propose you to utilize pure white paint on the walls in order to maintaining the big and luminous room impression and to apply black using furniture and decorations because, firstly, a complete black matte house may seem too much, for many of us. Don’t be afraid to mix and mingle with these 2 shades. Find a pattern that best suits your personality and use it throughout the whole room. Paintings and rugs are perfect additions to complete the color-scheme without being boring. Find curved or odd shaped art objects to give dynamicity to the area and make that black and white living room a reason to brag about.


Decorate your Living Room with Instruments

In most cases, the young artists want to give an artistic feeling to their home. Personality as well as freedom is the dream of every young artist. Today, let’s enjoy an interesting apartment that is filled with an artistic spirit. Whether it is a bunch of guitars on the wall or a viola with a built-in bar, be sure you have at least one musical instrument to show your soft spot for music and implicitly art. Get some inspiration from this apartment design and emphasize your own artistic style at home. Let your imagination run a bit wild and decorate not only the living room with a piano, but an entire hallway with bongos; your guests will not resist the temptation to hit on one of them, thus turning them (even only for a few seconds) into artists as well.


Small and Practical Apartment

This interesting apartment is situated in downtown Warsaw, Poland. The original, colorful and vibrant Tamka flat has an area of just 21.5 square meters. But it a feeling of space was infused by Jacob Szczesny. He designed this home with an aim at playfulness and fun, adding a lot of creative features along the way, like the flipping kitchen wall that can turn into a dining table. But that’s not the only part of furniture that can be changed. The whole “cafeteria” can be boxed in, revealing a modern spacious living room. Behind the packed kitchen you can find the shower separated from the main area by only a curtain, while the bathroom has a nice view of the bed, which in its turn lies on the built-in-wall washing machine. Now this is a good use of space.


Nutella Bread
Even if you might think that only pastries can make delicious cakes and desserts, you definitely didn't come across any of the DIY enthusiasts. Luckily for you, this webpage is going to help you bake the tastiest Nutella bread. Pay attention to the
• about two cups of all purpose flour;
• a cup or a couple sticks of unsalted butter;
• four large eggs;
• a pinch of salt;
• two teaspoons of vanilla extract;
• about a teaspoon of baking powder;
• a jar of Nutella;
• one and a quarter cups of sugar;

The process of making such a delicious dessert is quite easy. All you need to begin with is a preheated oven at 325 degrees and a greased and flour 9 by 5 inches loaf pan. Take the flour and combine it with the salt and baking powder in a bowl. Put this mixture aside and beat the egg in another bowl with the sugar. You might want to use a mixer for this, set at high speed, because you seek to get a fluffy composition out of it. Slow down the mixer and crack each egg at a time in the bowl. Add vanilla extract and the flour mixture from earlier. Be careful! This last procedure should be done in three different steps, because the flour needs some time to be blended into the entire batter.

Now, pour a third of the future bread on the bottom of the pan. Then, take the Nutella and spread half of the jar over the batter. Use a knife or spoon to make sure the chocolate covers nicely the whole surface. Pour the same amount of batter like before and then add the remainder of the Nutella. Essentially you repeat the previous step. Finally, spread the third of the batter on top and put to bake for about an hour. Check to see if it's done by inserting a toothpick in its center before taking out of the oven; if it comes out clean, it's finished. You should leave it to cool for 10 to 15 minutes before removing from the pan. Let it cool for a couple of hours before serving. Don't let it sit on the kitchen counter for more than 3 days. Enjoy!
These 8 Epic Food Fails Will Make You Feel Better About Your Cooking
Setting up the table might be an easy task, but preparing the actual dishes of food is most likely to get out the best (or worst) in you. In order to keep calm in the kitchen, even if the meal you invested a lot of work and stress into didn’t come out the way you planned, watch the amount of mess people manage to do to their cooking projects. You will feel better when realizing there are so epic fails out there.


1. Pasta should be not be stuck to the pan to the extent you can hold it upside down with no result.

2. The art of cooking involves not burning the entire or even half of the counter.

3. Be careful not to use the microwave in the way you aren't suppose to, like inserting metal bowl or objects, unbroken eggs etc.

4. Even though you may be creative, there is a certain common sense rule that a tennis racket is not recommended for draining the ravioli.

5. When cooking something, you might want to not forget the pan on the stove for too long. The result will surprise you!

6. And also, if anything catches on fire, like let's say pasta, don't try to continue to cook it; even if it's in water.

7. People may say eggshells contain a lot of vitamins they shouldn't be fried in the pan together with the eggs themselves.

8. Another rule of microwave cooking is the lid: remove it before setting the timer.
Abonați-vă la:
Postări (Atom)


