Food and Medicine - Chestnuts

Have you ever heard about chestnuts being used as medicine and also a great supplement when it comes to diets? Along with peanuts and walnuts, chestnuts can complement your diet and strengthen your immune system. The Turks were the first who used chestnuts as food, feeding their horses with it. And because of that they noticed that sick horses often got better after eating chestnuts. So because of this they believed chestnuts have magical healing powers. In fact, the high starch content of chestnuts, is a substance which makes them rather nutritive than healthy. Because of this same nutritional power, in bad times, people used ground chestnuts instead of flour. Gradually they became consumed as food. Today we can find chestnuts in various forms: boiled, fried, baked or creams. They have a high content of antioxidants and vitamins. Traditionally it was believed that whoever carries a chestnut in their coat pocket will be free from rheumatic pains. In reality, things are not that easy to solve, but chestnuts can really help against rheumatism.
They are also helpful when it comes to your immune system. You just have to put 30 chestnuts in 5 liters of boiled water and let them boil until the water drops in half. Pour the resulting liquid in the bath tub and repeat the baths every two days. It will help in a proper functioning of the immune system. Chestnuts have a high content of protein and carbohydrates and have been successfully used for medical purposes for several decades. They also contain a high amount of anti-inflammatory substances.

Apple Braid Recipe

Photo:eatliverun
When you're craving for an apple
dessert, but aren't exactly in the mood for baking a pie, here's a little trick
you might try: a cross between a pie and a doughnut. Read and follow the
instructions from this page and you will end up with a delicious,
mouth-watering, soft and lightly sweet bread, with a cinnamon apple filling and
vanilla cream glaze. To make the apple braid, you need to grab the following
ingredients.
Apple Filling:
·
three apples;
·
three tbls of granulated sugar;
·
a teaspoon and a half of cinnamon;
·
two teaspoons of lemon juice;
Bread:
·
two and a half cups of bread flour;
·
a quarter of a cup of granulated sugar;
·
a tbls of instant yeast;
·
a teaspoon of salt;
·
a cup of warm water;
·
two teaspoons of vegetable oil;
Glaze:
·
a third of a cup of sifted confectioner’s sugar;
·
five teaspoons of whipping cream;
·
half a teaspoon of vanilla extract;
·
a pinch of nutmeg and kosher salt;
Start by slicing the apples into
little pieces and combine them with sugar, cinnamon, and lemon juice. Put these
into an 8" baking pan for 15 minutes into the 350 degrees F preheated
oven. Meanwhile, make the bread by mixing the flour with sugar and yeast. Stir
for another 6 minutes after you've added the oil and warm water. When it's
ready to use, roll it into a large round-edged rectangle, just like in the
image. Next, use a knife to fashion strips into the two sides of the dough.
Take the apple filling, which
should have been done and also rested for a while by now, and spread them onto
the middle of the future bread. Beginning with the top strips, crisscross from
side to side in order to make the braid pattern, all the way down. Be careful
of the ends, maybe press a bit on with your hands to seal the dough properly.
Put in the same preheated oven for almost half an hour or sooner, depending
when it gets that tasty golden brown color.
Before the bread is done, prepare the glaze by
blending all the ingredients together until they become a smooth mixture. When
the braid starts to cool, use a brush and apply the glaze all over it. It's
recommended you transfer the braid from the pan on a fresh baking sheet after
you glazed it, so it won't get soggy at the bottom. It looks great. And it
tastes even better!
Source:eatliverun
Colored Washi Tape Clutch

Photo:cremedelacraft
As spring is approaching faster and
faster, you will also need to purchase some new spring-like accessories. This
means you should focus on searching for vivid colors that will upgrade your
winter look. But if you don't want to spend a lot of money accessorizing this
spring, you should create your own accessories. How, you should ask? Well it is
actually quite easy, you just have to follow these simple steps below and you
will have your own neon colored Washi tape clutch. Washi tape is a Japanese
masking tape, made out of rice paper and you can find it in a great variety of
colors. You can practically decorate anything with this tape, you just need a
little bit of imagination.
Supplies:
·
some Washi tape ( choose the colors you like);
·
poly envelope;
·
a pair of scissors;
·
some Mod Podge;
·
a brush;
·
x-acto knife;
·
a button;
·
thread and needle
Start by taping the Washi tape on the envelope. Begin
at the bottom of the envelope and cover it step by step until you get to the
bottom part. Once the envelope is covered in tape and you got the pattern you
want, take the x-acto knife and cut out the Velcro openings that you have taped
over. Cover the Washi tape with the Mod Podge, this will seal the layer and
will protect it. Let it dry and proceed to the last step. Select a nice and
stylish button and sew it on the top cover of your clutch. And there you have
it: a great clutch that will perfectly match both your evening and day outfit
and will definitely be something one of a kind.

Source:cremedelacraft
Lunch Box From a Milk Jug.

Photo:cremedelacraft
There are lots of products out in
stores which may cost you up to 20$ but in fact could be easily made with a
cost of 1$! Case in point: a lunch box or small container. Instead of spending
one month’s allowance on an object you could simply make do it yourself, learn
how to make a useful container by repurposing an item you already have at home;
like this lunch box from a milk jug. Here is the list of necessary items:
·
an empty milk jug;
·
a marker;
·
a pair of scissors;
·
a button;
·
thread and needle;
·
some embroidery floss;
·
an elastic band;
·
(optional) some decorative scrapbook paper;
·
(optional) a brush;
·
(optional) a bit of Mod Podge;
The steps for achieving such a
creative object are few and fairly easy. After you clean the milk jug (in and
out), take a marker and draw half a circle on each side of the jug. You should
have 3 of these half circles of the same height and the other one a lot taller;
the last one should best go opposite the side of the jug's handle, and should
be referred to as the lid. Now check to see if the flaps you fashioned fold
down properly. If the don't, take the scissors again and work on each corner of
your container, in order to make longer slits.
Then, take a large button and sew
it on the outside of the lid flap. Use the scissors to make a whole underneath
the bottom base of the container. Take a rubber band (preferably one which you
use for your hair) half way through the hole you just made and tie a knot on
the inside just like in the image. You are almost done. Try to make it more
appealing my decorating it. You could write something with decorative paper and
Mod Podge. Finally, there you have it: your own lunch box or container from a
1$ empty milk jug.

Source:cremedelacraft
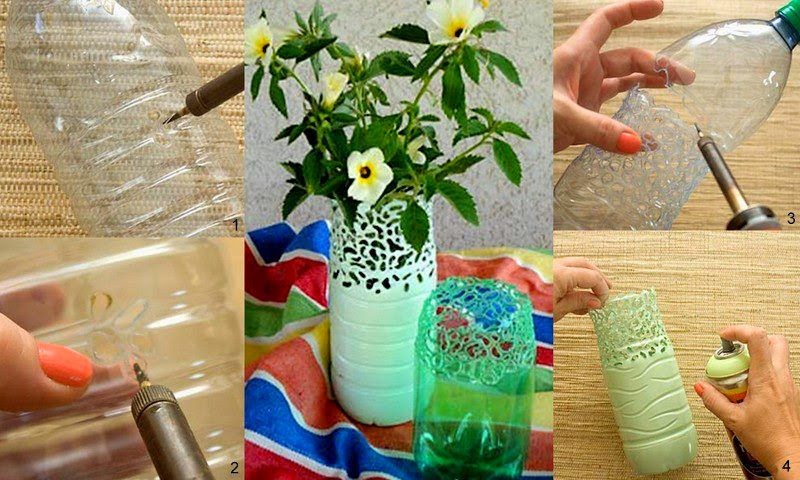
DIY - Vase From A Bottle

People think that DIY is only
suited for the ones who have artistic skills. That's not entirely true. Sure,
you need a bit of taste for art, but who doesn't have that? Even when we're
young we like to draw with certain colors and in certain ways. Here is a little
experiment you can try in order to make it more clear if you like doing DIY
projects. Learn how to make a gradient vase out with the help of some regular
daily objects:
·
an empty bottle of vodka;
·
a can of metallic spray paint;
·
some cotton rope;
·
a lighter;
·
some nail polish remover;
The process of cutting the bottle
is quite easy and involves high school physics. First, make sure you removed
all of the labels from the bottle. Then, take the rope and wrap it 5 or 6 times
around the place you want to cut. Remove it from the bottle (don't untie it!)
and soak in the nail polish remover. Put it back on and light up the rope,
rotating gently so the fire will go through the entire length of the rope. Work
over a sink filled with cold water.
When the flame starts to go out,
plunge the bottle into cold water. It will simply split at the desired
location. You could sand the edges in order to give it a soft feel. Next, spray
the bottom side of the bottle with the metallic spray paint. Place some flowers
in and you're done! It looks like it has been done by a professional.


Reuse - Recycle Old Boats

There comes a moment in a man's life when he has to throw
the anchor down, finish the adventure and settle in his own home. Joke aside,
if you do happen to have an old simple boat made out of wood, don't throw it
away! However awkward you think it would look in your house the truth is you
can significantly improve your home design by implementing some kind of
decoration centered around a wooden boat. You could use it together with a
mattress and cushion as a sofa, to get that nautical atmosphere into your
living room. Or keep it outdoor, fill it with sand so the kids will play in it
for hours on end, or with some soil and use it in the garden as a rustic
planter. Either way, you will surely get some creativity points for setting a
fresh, ocean inspiring ambiance. Cut it, flip it, repaint it in any way to make
your piece of boat an outstanding bookshelf or an one-of-a-kind coffee table
(by attaching a glass on top of it). Whatever project you choose for reusing an
old boat in your home, it will refresh your memories of the good old days
playing at the beach or sailing the seas. Check out the pictures for some
inspiration and get you started with your own project.


Creative and Cheap Ideas to Organize Your Kids’ Toys

A kid’s room can get really messy: toys
lying around the room, pencils and books on the desk. A lot of small things
that can easily get lost under the bed or other pieces of furniture. Organizing
this mess can seem an impossible task, but luckily there are plenty of great
ideas of how to organize a kid’s room. The ideas presented are all unique and
cheap to put into practice. You probably have most of the materials you will
have to use to create these projects at home.
The main idea is to make the organizers
look as colorful as possible as they will attract your child's attention and
will blend nicely with the rest of the room. Use plastic bottles as storage units
for pencils, scissors and other craft supplies. All you need to do is cut off
the top part of the bottle and tie a ribbon to the bottle or add some stickers
to it. Another great idea is to cut the bottom of the bottles and add a zipper.
You can sew the zipper to the bottle and create a pencil case this way.
To store pencils and crayons, you can also
use old cans. Stack the cans one on top of the other, creating a shelf and
place the crayons inside. Wrap the cans in patterned paper and no one will ever
notice what was the use of these metal containers before. You can also install
the cans on the wall to create a cute little work station. Use your old
electronic devices to create something new. Make an awesome box out of your old
keyboard. You can also use an old computer monitor or TV case as a book shelf.
Remove the screen and place all books and magazines inside.
You can always create nice decoration out
of old carton containers, such as milk and cereal boxes. You can cut the
material easily and give it a new shape, then wrap it in colorful paper to look
more cheerful. Store the drawings of your child in these or their craft
supplies. So as you can see, there are a lot of items in our homes that can be
recycled into creative organizers for a kids room.


Source:SoCreativeThings
5 Items, 10 Ways

With spring approaching, you have to find
out about the latest trends and purchase some of this spring's most fashionable
items. This may be a bit of a pricey process, so instead of buying every outfit
you see in the shopping windows, try and buy just a few of the basic items and
combine them in creative ways. If you feel you are a little lost when it comes
to matching clothing items, don't worry anymore as the pictures below will show
you exactly what you'll have to do. First of all, you will need 5 basic items
for your spring outfit: pink scarf, a button down denim shirt, tank dress with
a floral pattern, black or dark denim skinny jeans and a thick belt.
The first look is a great one for a nice
dinner in town or for a walk in the city. It is a really simple outfit, you
just have to tie the scarf around your waist and make a skirt out of it. Simple
and with a great impact. You can also use the scarf to make yourself a dress by
tying it around your neck and adding the belt.
Create a country look by wearing the floral
dress with the denim shirt on top. Add the belt and some stylish boots and you
will have the perfect party outfit. Make a tube top out of the scarf and
combine it with the skinny jeans. This is a really sexy look that will bring
out your curves and will not go unnoticed. Add a cute and colorful necklace and
the outfit is done.
Create a unique dress with the help of the
scarf, that will be perfect for an outdoor event. Simply tie the scarf around
on of your shoulders add some chic accessories and you're good to go. To get
the chic hippie look, wear the floral dress and then tie the scarf around your
waist. Fold the scarf the length you want your skirt to be and belt it. Now all
you need is to find the perfect summer festival for you and show off your nice
look. On colder spring nights, wear the scarf as a shrug, to cover your back.
Wear your floral dress with skinny jeans and don't forget to take the scarf
with you in your bag. Create a tunic out of your scarf, one that will leave
your back uncovered. Add the belt and go have a drink in the city with your
girlfriends. To make the tunic, tie the scarf around your neck, add fold up the
bottom part. At the end just add the belt.
The next look is great is you are looking
for the perfect work or school outfit. It's cute, simple and cozy. Wear the
denim shirt with the skinny jeans and add the neon scarf to make the whole
outfit more funky. Bring back the vibe of the 80's by wearing the floral dress
with the scarf on top. Fold the scarf to make a vest out of it, tying it around
your neck. And that is all, 10 great outfits made out of 5 basic clothing
items.

DIY Organization Hacks

For those of you preparing for a spring cleaning, these next organization hacks will be very useful. They are all DIY and can be done pretty easily by anyone. You can use a lot of things to sort your jewelry, from paint palettes to small containers. Make a holder for your phone's charger so you can use it in any place you want. Create it out of fabric, so you can put it in your purse and take it with you everywhere you go. Use carton rolls to organize your cords and decorate them with Washi paper to make them look nice. Use wooden palettes to organize your garden supplies. You can also find an old drawer that you can repaint and store them inside of it. Transform your plastic eastern eggs into ingenious food containers that will look cute when serving breakfast with your family. Below you will find a selection of other great ideas for your clothes, accessories and craft supplies. Wooden palettes can be used in a lot of ways. You can install them on the wall and make a box shape for your shoes or simply create some palette shelves for your fruits and vegetables. Fabric is also a great supply to create organizers, as you will see below in the pictures, there are a lot of original ways of creating storage units out of fabric. Take a look and share your thoughts with us.

via Ana White

via Ana White


via Family Handy Man

via Lotty Lindeman

via Real Simple


via Spoonful


via Brit + Co.
 |
| via Make It & Love It |

via The Idea Room

Tasty S'mores Pops

Source:tipjunkie
Desserts should be delicious and also fun to make. Forget
about oven baking and remember the days of campfires, in order to make these
tasty S'mores Pops. If you go through with this tutorial, you will learn how to
make this sweet and simple dessert. Here is what you will need:
- some graham crackers;
- chocolate melts;
- chocolate chips or candy bars;
- marshmallows;
- lollipop sticks;
First, break the crackers in half and place them on a baking
sheet, one half toped with chocolate and the other with marshmallows. Set them
up in an oven at 400 degrees F for a couple of minutes. Take out and start
inserting a lollipop stick in each of the marshmallows. After that, cover these
crackers with the chocolate grahams. Put in the freezer for 5 minutes, before
dipping them into melted chocolate. So while the crackers cool, melt some
chocolate in a bowl and prepare the toppings in a separate bowl with chocolate
chips or crushed candy bars. Time for dipping th entire S'mores in the
chocolate. Allow them to rest on a separate piece of baking paper and sprinkle
from the toppings bowl. Let to harden for a while and serve. You could also
gift them away. Either way, the S'mores Pops are great!....Original Article here:tipjunkie


Source:tipjunkie
How to Decorate a Small Kitchen?

1. Keep the strictly necessary only. Try to be drastic and to choose those things that you really use frequently. The number of the plates, the dishes, the cups and the glasses has to be approximately equal to that of the family members. The rest of the accessories can be stored in boxes in other parts of the house, in the limber box or in the balcony. The broom or the cleansers can be placed in the bathroom, the stove trays or the pans can be put in the limber box, while the vegetables could be stored in the balcony.
2. Find another place for the fridge. The fridge, the freezer, or the refrigerator can be placed in the hall of the house or in the balcony, if it is closed. The main advantage is saving the space which the fridge would have occupied, including the opening area of the doors. The second aspect considered is the fact that sometimes in the kitchen the temperature is increased because of the steams, phenomenon that can damage a fridge which doesn’t benefit of a higher degree of tolerance because of the environmental temperature.
3. Use hanging shelves. A divided shelve of textile material, hanged by the cornice in one corner of the kitchen, for example, will save a considerable space. What can you put here? Plastic bags and handbags, your correspondence and bills, drugs, matches, sweets, in conclusion, almost any small thing. These trifles generally occupy space and create the feeling of agglomeration and chaos.
4 .Buy folding chairs. There are lots of reasons that nowadays make the idea of a lunch in family to sound impossible. Maybe in your family, the each and every member eats in a hurry at no matter what hours. But this is just the perfect excuse for not buying folding chairs. Folded and neatly stored, they will occupy very little space, leaving you the possibility of moving freely in the kitchen when cooking or cleaning. Besides, you’ll also avoid the embarrassing moments when uninvited guests knock at your door.
5 .Opt for a multifunctional table. Get rid of the rectangular, large table. Choose an elongated one which can be attached to a wall or can be placed perpendicularly, leaving you enough space for freely moving around it. With a 1-m length and 40-cm width table you can realize an excellent compromise. Such an article can be endowed with interior, metallic, well divided shelves, so that you can store bottles (in a specially created area), the bread box, papers, wipes or even plates. This way, you transform a piece of furniture of a single functionality into a substantial storage space.
6. Create a space for household objects. If normally these are placed randomly everywhere in the kitchen, following the route of the closest extension cord, now it is the moment to gather them in a single place. A complex of shelves placed on a free wall can help you to find somewhere where to put all the household objects of your kitchen. At Ikea, you’ll find shelves and supports of different dimensions so to create your own complex. Choose the width of a wall and the smallest possible depth (minimum equal to that of the microwave). Thus, on the superior shelve you may place the cafetière, the coffee grinder, the blender, because these ones make use of unlimited space when used. On the following shelve, place the microwave. Attentively measure it and limit the dimension of this shelve to that of the microwave so to be left more space for the next shelve. This, because the microwave has frontal opening. Use the last shelve for the toaster, grill, mixer, or popcorn machine. Beware! Leave little space between the shelves and the wall so that the cables to be placed as neatly and safely as possible. Put on each shelve an extension cord for every machine so to stay worriless.


Transform A Plastic Bottle Into A Flower Pot

It is very simple to recycle a water, juice or soda bottle into a flower pot. You will need: a knife, acrylic paint and a little imagination to turn an old plastic bottle into a beautiful and funny flower pot. It’s a cheap and easy Do It Yourself project. The plastic bottles pots can be placed inside or outside and you can plant ornamental or aromatic plants in them. Play with your children and realize fun plastic pots. Look here for some ideas.
Take the wall of hanging soda bottles as inspiration and design your own eco wall. Use the DIY plastic bottle flower pots to express your artistic side. You can shape them into animals or birds, like swans, and place them in the garden. Show your true emotions and plant some bright looking flowers in one of the homemade plastic pots and hang it next to your front door. This way, people will great you with a big smile on their faces.


Abonați-vă la:
Postări (Atom)


